Friday, 19 October 2012

Magic Slider Cards...

     These are the two Magic Slider Cards I have been working on this week. I always wanted to try them, but was a bit scared I would waste the papers ( I sometimes tear up the paper in frustration :D )

      We are going to my in-laws' place tomorrow and we have four nephews and two nieces. I have been trying to make a card for everyone, but couldn't find the patience and time. I could make only two and these are for the youngest nephews. Hope they like them :)


          I have followed two different tutorials for these cards. The one with the li'l monkey is done using this tutorial. The image is hand-drawn referring to an image I got from a friend.


        You can find the written instructions for this video here.

        I found another tutorial using A4 sheet n it was slightly larger than the first card. So I made the one with a rocket.


       Here's the tutorial I found on a blog by Sharon.
       I found so many other tutorials which are more or less the same as those I have mentioned here. Let me know if you follow some other method :)

Supplies:
  • Cardstock: White A4
  • Acetate sheet ( or transparency sheet if you live in India )
  • Black permanent marker, Water-colour pencils from Faber-Castell and Colour markers from Luxor
  • Quilling strips - Black, Brown from Itsy Bitsy
  • Satin ribbons - Black, Copper
  • Glitter glue - Silver
  • Buttons
Challenges:


Hope you liked them. Please leave your comments :)


Saturday, 13 October 2012

Pink!!!

    Another card in Pink! Its a Wedding card, inspired by 365Cards Day223 - Double the Fun and CAS-ual Fridays CFC#74 - Put your {Heart} into it

    Its a CAS card, with 2 colours of Ribbons, 2 pairs of buttons ( in 2 colours) , 2 Hearts, 2 colours of Cardstock, so that it fits both the challenges :)


Supplies:

  • Cardstock: White, Pink
  • Satin Ribbons: 2 Shades of Pink
  • Buttons
  • Silver Glitter Glue
Challenges:

Hope you liked it. Please leave your comments :)

Thursday, 11 October 2012

Neon...

    Today's challenge at 365Cards is about using   NEON  colours. After a search in my stash, I found some old acrylic yarn lying around and also a flower loom. The loom was my Mom's n I didn't know how to make flowers with it.

    Anyhow I tried n tried and got something that looks a bit like a flower, but it was not good enough to include in my card. Then I got this great idea. Why not fold the flower in half and make it look like a butterfly? So I made one, n also a flower which does look like a flower :)

   This is my butterfly


and flower...


Together...


    And finally, here's my card.


      I used black cardstock, as I found it highlights the NEON colours. The sentiment is handwritten.

Supplies:

  • Cardstock: Black
  • Patterned paper: Gift wrapping paper
  • Yarn: Neon colours
  • Flower loom
  • Markers
Challenges:

Update:
18Oct2012
Checking 365Cards for the winners is the 1st thing I did today n I won a $10 Gift Certificate from Freckled Fawn, for the Day224. The best way to start one's day!   :)

Saturday, 6 October 2012

Feeling Floral...

    This is my card for today. Its very simple. I wanted to do something that has lots of flowers n warm colours. Since I didn't have such patterned papers, I decided to make one. I took a paper out of my sketch book ( it has that creamish white colour n is strong enough) n painted simple flowers on it with Red, Yellow n Orange Acrylic paints with a Cotton ear-bud :) I let them dry n ta-da! My paper is ready.

    I glued it to White handmade cardstock n attached a piece of Red cardstock to the front layer.
I painted a cake on a Red Handmade cardstock with White Acrylic paint.


         The inside is simple with just "Happy Birthday" written on a red card.


Supplies used:

  • Cardstock: White n Red handmade
  • Acrylic Paints from Fevicryl Hobby Ideas
Challenges:
Hope you liked it. Please leave your comments :)

Thursday, 4 October 2012

Pretty Pink!

      We have a friend's wedding coming up this month n I've been planning a card, but was caught up with other things. Finally I got some time n here it is.


I quilled the pretty pink roses n leaves :) Here is the closeup.


      There are lots of online tutorials for quilling roses. You can check them out or here is a link. http://wandasworx.com/pages_blog/quilled-roses-the-easy-way/

       The inside of the card looks like this.


     I left some extra card on the top to make holes n make it a wall-hanging if wanted. The sentiment is handwritten. The man n woman silhouettes are also drawn n cut by me. I cut the apertures using Paper cutter. I'm thinking of getting the punches. But I find them a bit pricey. Have to keep on searching.

Supplies used:
  • Cardstock :  Handmade, White n Pink( Glittery, though you can't see the glitter in the pic)
  • Quilling Strips: Pink n Green from Itsy Bitsy 
  • Silver Glitter Glue from Pidilite 
  • Pink Satin ribbon
  • Markers
  • Paper cutter
   I'm entering this card for the following challenges. ( I know this is a very long list, but I just want to know more people n more people to know me)

Hope you liked it. Please leave your comments. Your feedback means a lot  :)

Saturday, 29 September 2012

'Fall'ing in Love...

       For the Day 212, the 365Cards gave this Colour Combo Challenge.


       Since there are so many challenges on Fall this week, I decided to go on with it. I wanted my card to be Clean n Simple.

       Instead of layering cardstocks, I used Gift wrap paper ( It has all the shades mentioned in the colour combo, though the green is of a lighter tone, "Laurel green" as per wiki) n Quilling strips in the border to give the layering effect.

       I made an Origami maple leaf ( strictly speaking, may not be called Origami since cutting of paper is involved) with the help of this tutorial. You start with a square piece of paper ofcourse.

   
        Isn't it beautiful? It is easy too! You just need a good pair of scissors :)

        I used the following supplies.

  • White cardstock
  • Gift wrap paper( fall leaves pattern) n Rusty red Quilling strips for the border
  • Embellishment: An Origami Maple leaf made from Orange coloured craft paper
  • Markers for writing the sentiment
       Here's my card.


I'm submitting this for the following challenges.
Hope you liked it. Please leave your comments. Your feedback means a lot :)

Thursday, 27 September 2012

Early Christmas!

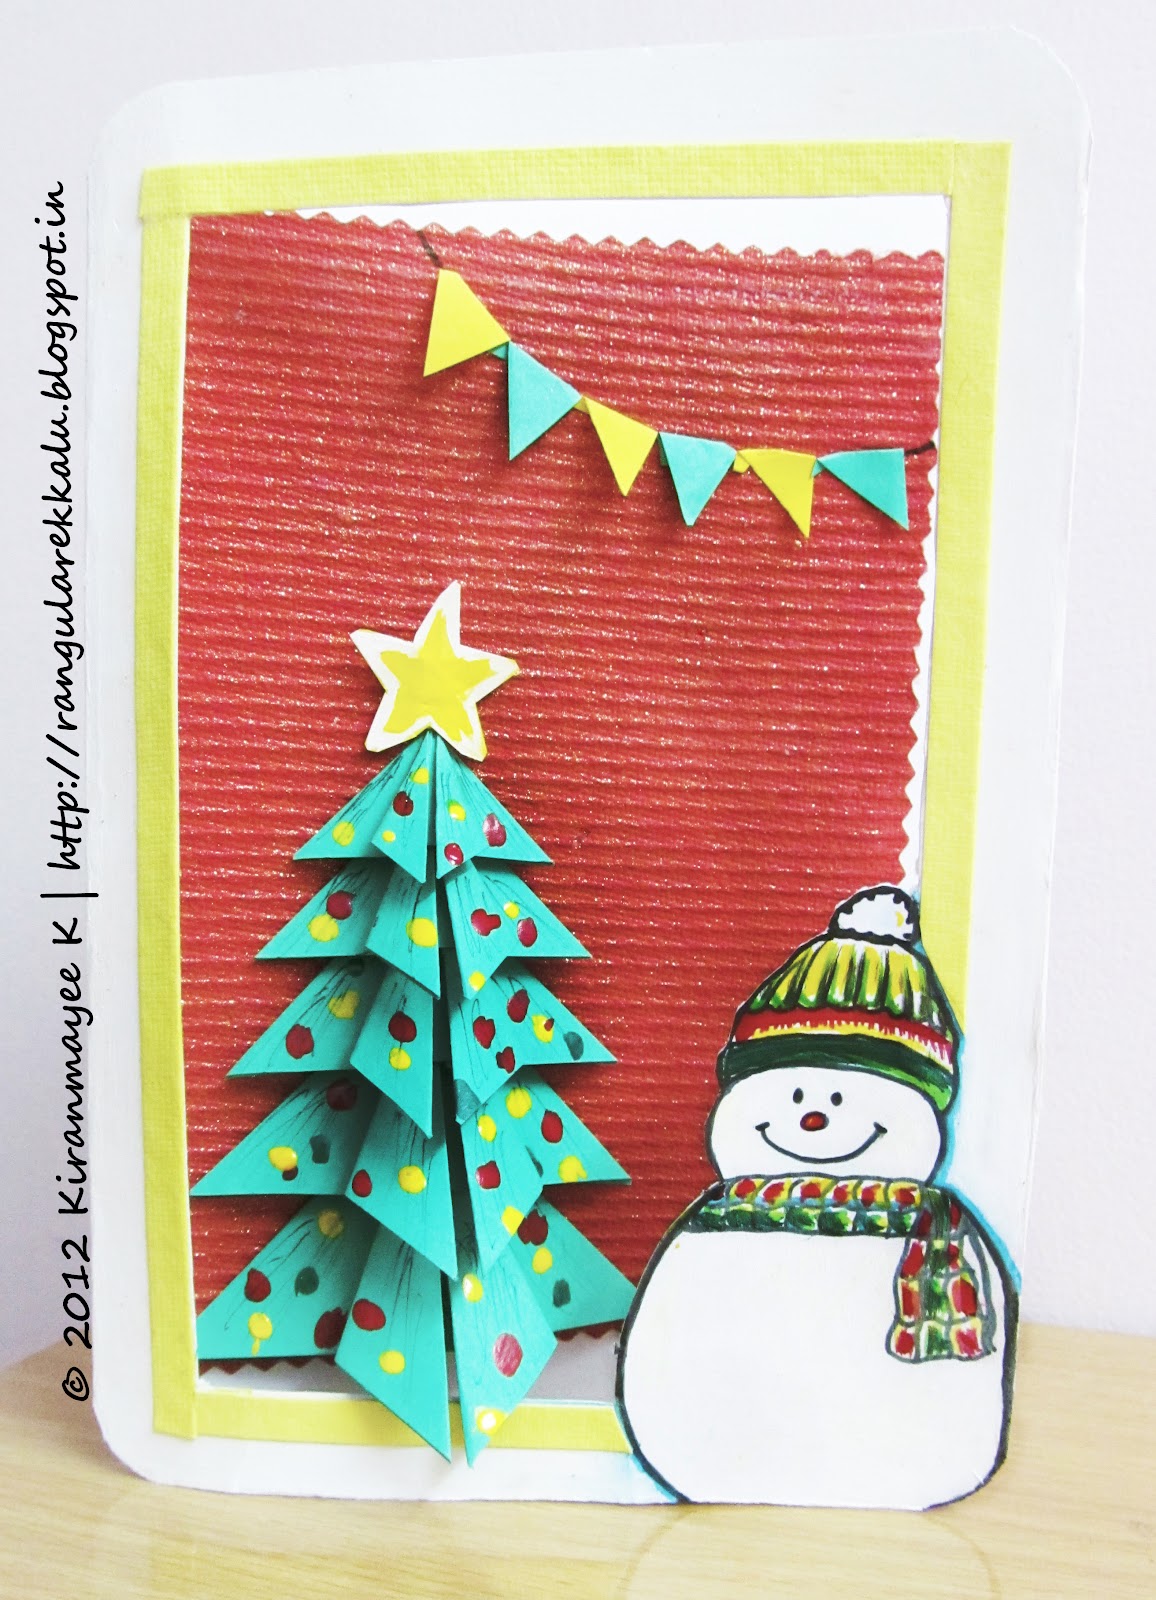
       I made this card for all the early Christmas challenges. When I saw the 365 Cards challenge for Day 208- Imagine this: Falling Snow, it reminded me of how I used to dream, when I was a child, about snow falling all around my house, walls covered with snow, n me making little snowmen (  It doesn't snow where I live! ).

       So obviously I decided on a Snowman n an Origami Christmas tree. There are so many tutorials for Origami tree. But I wanted the tree to give dimension to the card, so I went along with this tutorial n made the tree... http://wegrowbyourdreams.blogspot.in/2007/11/origami-christmas-tree-tutorial.html

Supplies used:

Card stock : White, Red(handmade corrugated)
Embellishments: Origami Christmas tree n Flags with Green n Yellow craft paper
Markers for colouring
Faber-Castell Pinking shears

 I haven't written a sentiment, since it is obvious :)


         I just love the way the tree sticks out of the window :)

I'm submitting this card for the following challenges.


Hope you liked it. Please leave your comments. Your feedback means a lot :)

Monday, 24 September 2012

On a Sunny Day :)

    Hi! Hope you all had a great weekend! :) Last week, my husband returned home from work with a great news. He had holidays on Wednesday n Thursday n said he could work from home on Friday, so that we could get a 5 day vacation :) So we went to my parents' place. We clicked so many pics on our way n had a great time at home :) Will try to share some good ones if possible.

    Now, coming to the cards. I thought I would complete all the 7 challenges @365 Cards  last week. But with our unexpected vacation, I was just happy looking at the other participants'cards.

   After returning home, I just couldn't make up my mind about which challenge I should work on. Finally I decided on Day 207-Super Sketchy Sunday and came up with this.


   I had no idea I was going to make a monochromatic card till I started. I used two shades of yellow here. For the border n candles, I used handmade paper Quilling strips. I cut the shape of cake from coloured papers and layered them. For the confetti, I shaped the Quilling strips into Spirals and glued them to the card. Finally I attached the handwritten sentiment and a star made with craft foam to the top right.

    I'm happy with the Sunny effect I've created in the card with the limited supplies I've got. Isn't it apt for the Sunday challenge?

    I'm submitting this card for the following challenges.

Hope you liked the card. Please leave your comments, your feedback means a lot :)